The Baynton-Williams Gallery
A family business speciallising in fine antique prints and maps
Established 1946
 
A Short History of Print Art 1500-1860
By Roger Baynton-Williams
 

There is a mystique surrounding the ways that old prints were made, although the main printing techniques are quite simple operations. These notes explain the methods, and, we hope, help you to determine the way that any early print was made. Such an understanding will give greater enjoyment of the artistry that was required to make them.

With the notes, a date span is given which are the dates that the method flourished.  There are, of course, prints made by these methods after the final date noted, when artists rather than commercial printers extended the technique's lifespan.  Also mentioned are the principal uses of each method, and these are the subjects which were most suited to the method.

These notes are deliberately brief, outlining the standard printing methods used during the period, providing fundamental information.


"Printing", for the purposes of this article, is the transfer of ink from a prepared medium onto paper in a way that an image can be reproduced repeatedly. These media were usually flat, so there are three materials used in the making of the plates and blocks that printed pictures:

wood, hard and fine grained 
metal, usually copper, steel or zinc
stone, porous, like limestone.


There were three ways in which the materials were used.  The wood and metals required some sort of engraving, cutting into the material in various ways to produce an image which could then be transferred onto paper with a printing press.  These methods are either 'relief' or 'intaglio.'  Printing from a stone required a flat surface, without any incisions, and is 'lithography.'

 
RELIEF

Example of a woodcut printUsually applies to wood, known as 'WOOD-CUT' or 'WOOD ENGRAVING.'  Other materials were used, metal being quite common; lino or any easily cut substance was used in thelate 19th century.  The parts of the wood which provide the image on the paper stand up, in relief.  The parts which show white on the paper have been cut away, using a variety of small chisels.  Hard, fine grained woods were used, fruit and boxwood were preferred.  Some of the best could produce fine detail, but there is a limit to the amount of wood that could be cut away to produce a fine line.  It was not possible to introduce tones, like it was with intaglio methods; the same colour ink appears throughout the print. Generally, early wood-cuts are rather crude.  Wood-cuts were made from a plank, cut with the grain.  Wood engravings were made from wood cut across the grain.  Finer detail could be achieved with wood engraving.

Span: 1450-1580.  Strong revival in the late 19th century. Used for all subjects.


Example of a Baxter printBAXTER COLOUR PRINTS.  George Baxter is regarded as the first to develop a system of colour printing using 'separations,' which is one block or plate for each colour, as modern printing.  Baxter used wood blocks, one for each colour, plus at least one metal plate for the fine detail.  Unlike modern printing, Baxter used as many as twenty-seven blocks to produce one print, although the customary number was about fourteen.  The reason for this large number is that he could not tone a colour, so that if, say, he needed a dark red and a light red, he needed two blocks.  The problem in printing with separations was to achieve the correct 'register,' which means that each colour had to be printed in exactly the right position.  To look at the crude blocks, one wonders how this was possible, or that Baxter could produce such fine quality work.  The irregular shaped blocks were clamped into a steel frame that had screw threads to position the block precisely.  The prints are distinctive; the inks have a sheen as if varnished; they are usually small and finely detailed, ideal for Victorian sentimental subjects.

The earliest Baxter prints were made in the 1830s, reaching a peak as a result of the Great Exhibition in London in 1851.

 
INTAGLIO

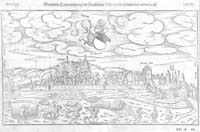
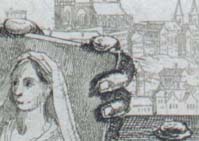
The opposite of relief.  The metal plate was cut into, either by using special tools or with the controlled use of acid.  The incisions eventually produce the detail in the print.  Explaining the last part first, when the engraved plate is ready to be printed, the whole surface is covered with ink, carefully rubbed into all the incisions, and then the surface is wiped perfectly clean, leaving ink in the incisions.  What creates various tones on the paper is that the engraver varies the depths of the incisions, the deeper the incision the more ink will be in it, and the blacker will be the detail on the print.  The finest detail will show as nothing more than a finger print on the plate.

Assuming that the paper has not been trimmed, all intaglio prints will have a 'plate mark,' an indentation in the paper around the outside the image, caused by the pressure exerted on the plate by the printing press.  The pressure meant that the plates were literally flattened with use; prints show loss of fine detail after a small number had been printed.  The best etchings and drypoints were printed in numbers of only about fifty.  It was definitely not possible to produce prints in unlimited numbers.


Example of a etching ETCHING is the earliest form of intaglio.  It was originally used to decorate metals, like silver and armoury.
The method is that the plate, usually copper, (zinc was used in the late 19th century) was coated with a thin layer of black resin, which is acid resistant.  The etcher uses a fine needle to scratch through the resin, just enough to expose the plate, where the lines are to appear on the paper.  When the detail is complete, the plate was subjected to acid which bites into the exposed copper, creating the incision.  The longer the acid bites into the copper, the deeper will be the incision and the blacker the line will be on the print, so where the etcher has the required depth, more resin is applied to the plate, preventing further bite, known as 'stopping out.'  The etcher continues in this way until the plate is completed.  The method is comparatively simple; etchings are usually the work of the artist.  Most other prints are the work of at least two people, an artist and an engraver.

Span: the earliest etching is dated 1513.  Flourished from 1550 to 1700.  Revived in the middle of the 19th century. most subjects.


SOFT GROUND ETCHING is a variant.  A softer resin was used to cover the plate and then a thin sheet of paper was laid over it.  Using a soft pencil, the etcher drew the design onto the paper, and where the pencil touched the paper, the resin adhered to it.  When completed, the etcher peeled the paper away from the plate, lifting the resin which had adhered to the paper with it, thus exposing the metal.  The plate was subjected to acid like normal etching.  The resulting prints look similar to soft pencil drawings.
Span: 1780 to 1830. Used for rural and domestic scenes.


DRYPOINT was a way of adding to an etched plate without the use of acid, the etcher using a needle directly onto the copper to add further detail.  Unlike engraving tools, which cut the metal cleanly, the needle scraped the plate, leaving a residue of metal at the side of the line, known as 'burr.'  The burr held more ink during printing, giving a blacker and richer effect to the print than with normal etching.  The burr wore away from the plate after very few impressions had been taken.

Span: as etching, but especially used in the late 19th century. Mainly used for portraits and still life.


Examples of aquatints AQUATINT is another form of etching except the detail was worked in areas instead of lines.  A pure aquatint does not have any lines in it; any lines, such as the rigging of a ship, were done by etching.  The word is shortened from 'aqua-fortis [strong water, meaning acid] tint,' tint referring to the tone in the print.  It has nothing to do with watercolours, although many made from about 1810 resemble watercolours.  Most early aquatints were printed in monotone, resembling pen and wash drawings.  The method was to remove an area of the resin where a tone was required, and over this area a resin powder, known as 'ground' was laid and then subjected to acid, as with normal etching.  The acid bites in to the copper round the particles of resin.  The effect is an irregular shaped wire netting, tiny, almost circular white dots surrounded by ink.  Various grounds were used depending on the effect required, and usually the best aquatints were made with the finest grounds.  A complicated method, usually requiring the skill of a specialist engraver.  Very few artists were able to make their own aquatints.


Span; 1780 to 1830, short lived, partly because of the complication, and partly because of the introduction of lithography, a much easier printing method. Mainly used for topography, shipping, military and sporting prints.


Example of a line engravingCOPPER AND STEEL LINE ENGRAVING.  The engraver cut minute grooves in the plate with variously shaped chisels which have handles shaped like mushrooms, the rounded part resting in the palm of the hand, the stalk with the chisel protruding from it, extending between the fingers.  Again, the deeper the groove, the more ink it will hold and the blacker will be the line on the paper.  Some of the finest detail is quite difficult to discern on the plate.  The best engravers produced wonderful tones and textures with this technique.
Steel was introduced later, and, being much harder than copper, could produce finer detail.  Also, steel plates lasted longer.  During the 1830s, engraving machines were used which ensured parallel lines, useful for engraving skies.
Line engraving and etching can produce prints which are similar in appearance, both using lines to create the image.  Lines in etching are much more irregular, without being straight, unless they are essential to the picture.

Unlike wood-cuts, additions could easily be made to plate simply by adding necessary detail.  Alterations could be made by hammering the plate from the back, smoothing the surface and re-engraving.
Span: copper 1550 to 1830, steel 1820 to 1860. Used for all subjects.  Most early maps are copper engravings.


STIPPLE ENGRAVING
.  As the title suggests, the prints are comprised of dots.  There were two ways that this was done.  Generally, the method was a mixture of etching and engraving.  The engraver covered the plate with a resin, as etching, and then dotted through the ground with a needle.  Acid created the incisions in the plate.  Some stipples were engraved directly onto the plate, using a curved instrument, called a 'roulette,' with tiny spikes on the convex side, which was rocked over the plate to make the necessary incisions.  The roulette also created burr, as drypoint.  Sometimes the roulette and the resin systems were used on one plate.
Span: known to have been used in the 16th century.  Flourished from 1780 to 1830.
Ideal for portraits and domestic scenes, especially when printed in colours. (See below for stipple illustrations)


MEZZOTINT.  Instead of working on a polished plate, the mezzotint engraver began by roughing up the surface of the plate with a roulette, as stipple engraving, but working more thoroughly.  At this stage, the plate would make an entirely black print.  The engraver then put in the tones of light by smoothing out the surface as required, using a 'scraper' to cut off the roughened plate.  The pure white areas have to be completely smooth.  The method was ideally suited to portraits.  A good mezzotint engraver could produce wonderful textures, especially clothing with distinctive velvets and satins.
Span: 1650 to 1830.
Best for portraits, but used for most subjects.

 
PRINTING FROM INTAGLIO PLATES
With all the processes, it was necessary to ink the plate immediately prior to printing.  This, as well, was an art.  Printers made their own inks, thick, oily substances.  The ink was rubbed into the plate with a 'dauber,' working in circular movements to ensure that ink was forced into all the engraving.  Then the surface of the plate is wiped completely free of any excess ink, leaving ink in the incisions.  The plate was then ready for the printing press.  The paper was slightly moistened to make it more receptive to ink.  Great pressure was required to force the ink onto the paper, indicated by the depth of the plate mark.  The early presses had flat beds with the press coming down vertically; later presses used rollers, like a domestic mangle.  When the print had been made, the paper was laid between cloth to dry, the prints stacked up and put under light pressure to keep them flat.  The printer then had to re-ink the plate all over again before another print was made, an operation which averaged twenty minutes, depending on the size and detail of the print.

INTAGLIO COLOUR PRINTING.  Aquatints, stipple engravings and mezzotints were sometimes printed in colours from about 1780, but unlike modern printing, the prints were made by putting the plate through the press only once.  The method was to apply the coloured inks to the plate as if painting a picture.  It was a lengthy and complicated procedure, far more so than using one ink.  Often three or four colours were used, the final colours being added by hand.  The best are completely colour printed, but these are rare.  The benefit is that in a person's face, for example, the colour is flesh coloured.  But if the print had been made in black, and then hand coloured, the engraving would be black with a wash over it,  looking dull and flat, and in need of a shave, which is not the best thing for a female face, and lacking the vitality of colour printing.


LITHOGRAPHY

A perfectly flat, fine grained, porous stone was used.  The lithographer drew the image onto the stone with black wax, like a crayon.  Once the image was complete, the stone was thoroughly moistened.  The wax repels the water, the stone absorbs it.  Then an ink roller is run over the surface and the reverse happens; the water repels the oily ink and the wax accepts it.  Once the whole surface is inked, the block is ready for the press.  Obviously, it is a much more simple method than intaglio.  Though the method was discovered at the end of the 19th century, it was not until about 1830 that lithographs appeared in any number.  Because of the comparative simplicity, artists and printers quickly turned to lithography, superseding the expensive and laborious intaglio methods.  Like etching, artists could produce their own prints, and because the resulting prints have a similar appearance to a pencil drawing, the method suited them. 


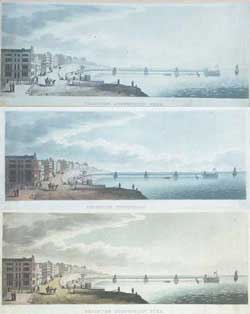
From about 1840, printers began to use an extra stone to add tone colour to the print, blue, yellow or brown being commonly used.  These are known as 'tinted lithographs,' which does not mean they are fully coloured.
Span: earliest use was about 1790; flourished from 1820.
Suited all subjects except maps.  (see below)
TRANSFER LITHOGRAPHS are a mixture of engraving and lithography.  Because the fine definition of engraving could not be achieved with pure lithography, an engraved plate was first used and a print made from it on a special transfer paper.  While the ink was still wet, the print was laid over the stone, transferring the ink onto the stone.  The stone was then used to print in the normal way.  Apart from the benefit of fine definition, it was easier and cheaper to print from a stone.  The prints are sometimes difficult to detect from engravings.  There will not be a plate mark.  The system had a particular advantage to map publishers.  The metal plate could be stored safely, additions made to it as required, and a single print made to transfer to stone, from which a large number could be made without any visible sign of wear to the metal plate.
Used from about 1860.
 

This article has been expanded into book form


Art of the Printmaker by Roger Baynton-Williams  
THE ART
OF THE PRINTMAKER

1500-1860


by Roger Baynotn-Williams


  Back to Top